 Sorry for the late post, I'm a little under the weather today.
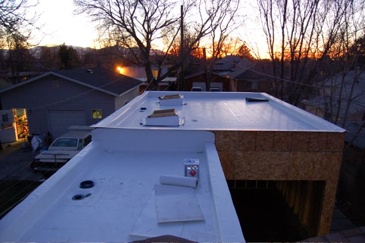
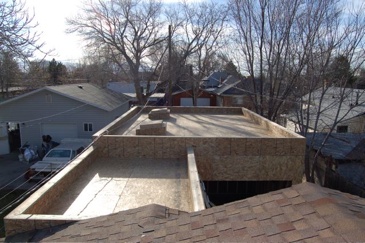
Today Brady roofing finished up the last touches on our roof. The picture here is actually from yesterday when they still had some loose ends to take care of. Their crew did a great job and were great to work with. I got the original bid from them about 4 months ago, and they have been faithfully calling me every two weeks to say "looks like we have you scheduled for monday". Back when we didn't even have our excavation done it was pretty funny. I was glad to finally be ready for them to come. For those that are following pricing, the bid came in just over $6,000. It could have been less if we had made some different design choices, such as sloping the roof with the framing instead of having the roofers do it on top.
Sorry for the late post, I'm a little under the weather today.
Today Brady roofing finished up the last touches on our roof. The picture here is actually from yesterday when they still had some loose ends to take care of. Their crew did a great job and were great to work with. I got the original bid from them about 4 months ago, and they have been faithfully calling me every two weeks to say "looks like we have you scheduled for monday". Back when we didn't even have our excavation done it was pretty funny. I was glad to finally be ready for them to come. For those that are following pricing, the bid came in just over $6,000. It could have been less if we had made some different design choices, such as sloping the roof with the framing instead of having the roofers do it on top.
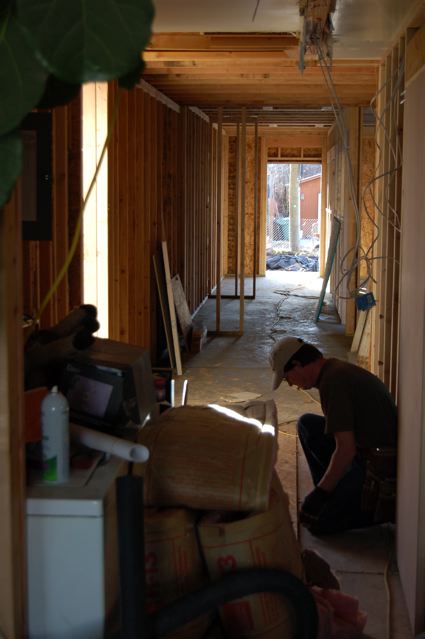
 The framers finished up the last of the rough framing yesterday. Chris from Benchmark Renovation did a fabulous job framing in the skylights and the projected window. In fact, pretty much everything those guys did turned out real nice. They demoed out the back of our house where the addition connects on, and it is great to see those interior spaces finally connected. We had our framing inspection yesterday too, and apart from a few small things everything passed. So now we can start with the electrical. One surprise that we did find is that the bottom of the wall on our existing house was rotting. It sits too close to the sidewalk outside and is constantly moist. We ripped out the old wood and put new wood in, and this summer I will need to rip out that sidewalk and grade it for proper drainage.
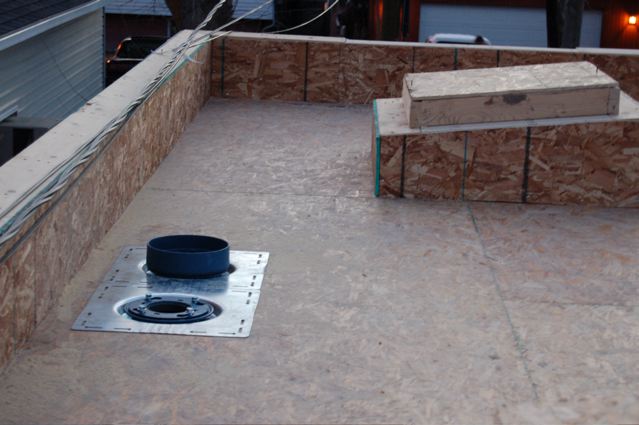
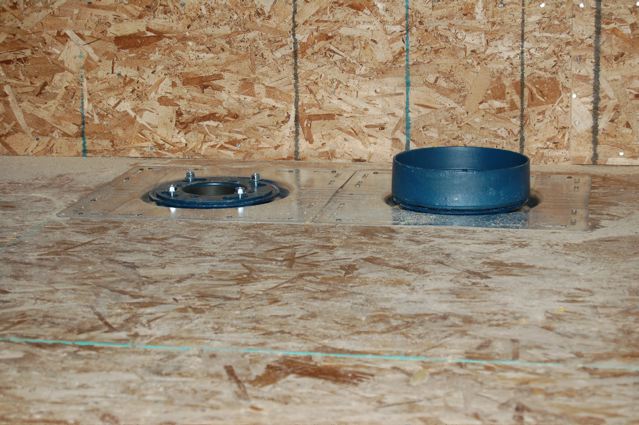
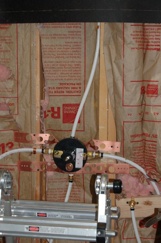
I installed the roof drains last night as well. The hardest part was finding someone that could get me the right product. For some reason everyone looked at me like I was a complete idiot when I asked for a roof drain. I ended up having to contact the local Zurn rep, and figure out which product I needed and then special order it from one of the local dealers. The one I ended up with turned out to be very easy to install, and very solid. The only downside is for four drains it cost almost $500. Ouch. That was a cost that I had not planned on. The good news is now that I have them in, the roofers can get a roof on it.
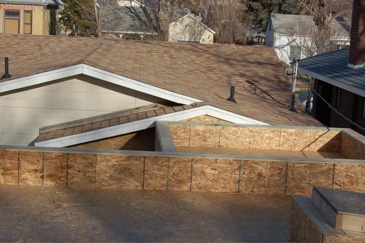


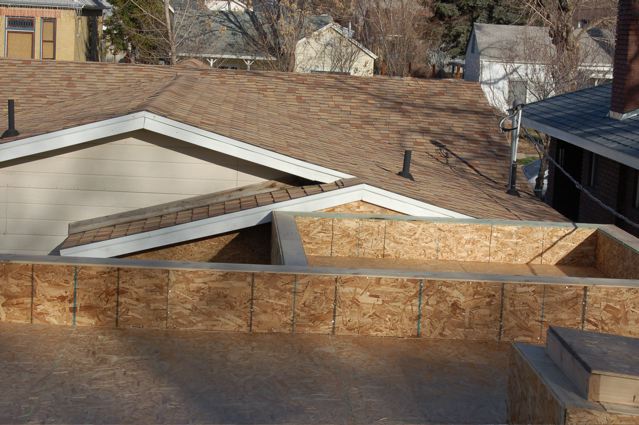
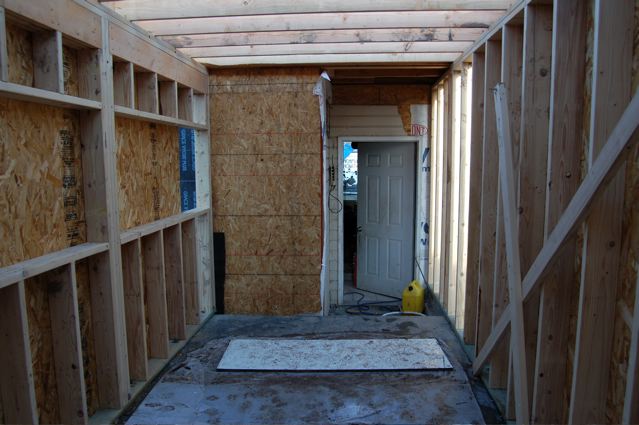
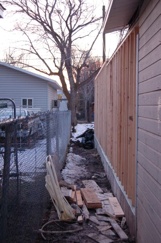
 Last Thursday and Friday we rolled all the roof joists and sheathed the whole addition. That means that we are almost ready to put a roof on. All that is left is building the parapet wall around the top and sheathing it and putting in the roof drains. The framers should have the parapet done by the end of the day, and I will put in the roof drains after work. The roofers were planing on coming today, but we are not quite as far as we needed to be obviously, so hopefully they will be able to come tomorrow. Its great to see the spaces even more defined, now that it is all enclosed. I am sure the whole space will transform itself again when we get the windows and doors in. Hopefully that will be in about two weeks. That should give me just about enough time to insulate and wire the whole thing.

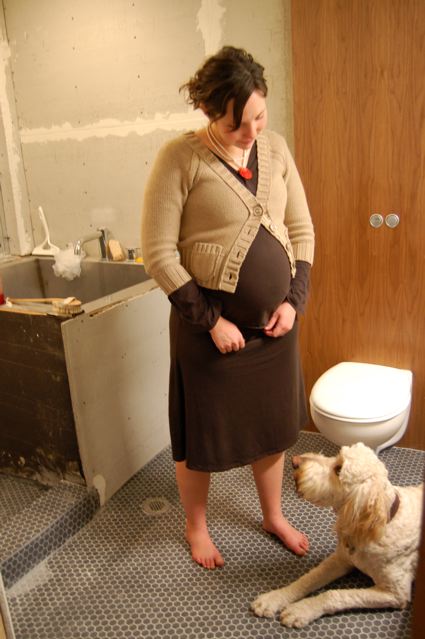
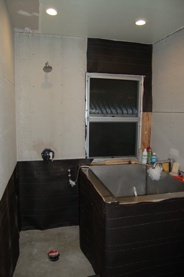
 I finally finished setting all the tiles in the bathroom, thanks to my stepdad who came down on Saturday to help. We spent almost 9 hours straight on Saturday setting tile. I just have a couple of small little trim pieces to put up, and then I have to grout and caulk the whole thing. Besides that, the list of things to do in the bathroom is quickly shrinking. We have one more light to install, and a fan. We also need drawers for the vanity and trim for the door and it will be all done.
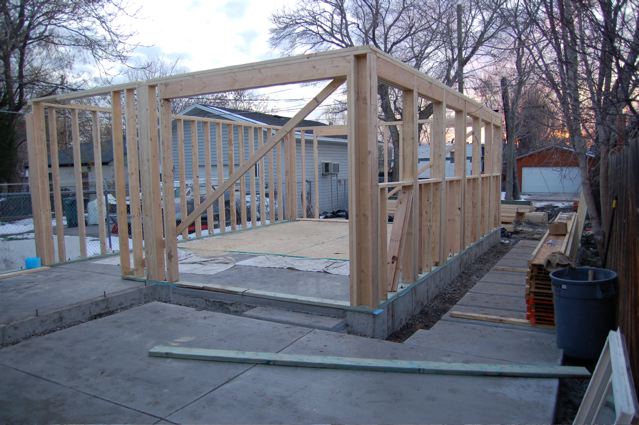
As far as the addition, they put up a couple more walls yesterday, including the walls that connect into our existing house. Today I think they will probably do roof joists, and hopefully some exterior sheathing.
I finally finished setting all the tiles in the bathroom, thanks to my stepdad who came down on Saturday to help. We spent almost 9 hours straight on Saturday setting tile. I just have a couple of small little trim pieces to put up, and then I have to grout and caulk the whole thing. Besides that, the list of things to do in the bathroom is quickly shrinking. We have one more light to install, and a fan. We also need drawers for the vanity and trim for the door and it will be all done.
As far as the addition, they put up a couple more walls yesterday, including the walls that connect into our existing house. Today I think they will probably do roof joists, and hopefully some exterior sheathing.
More pics after the jump.
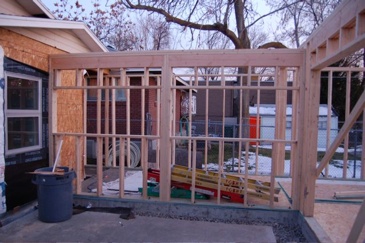
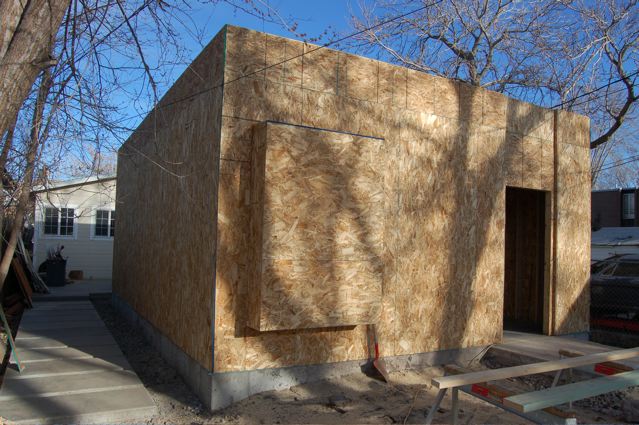
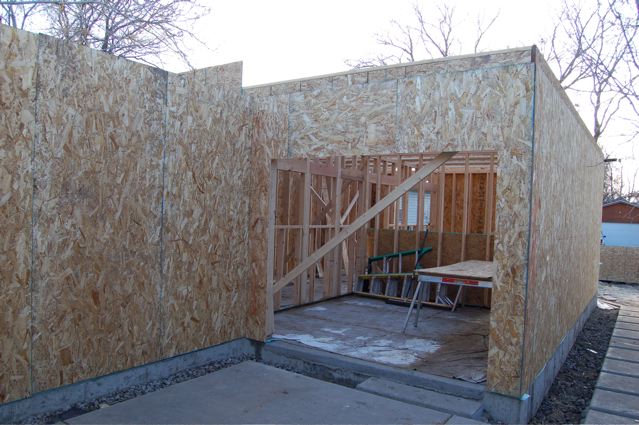
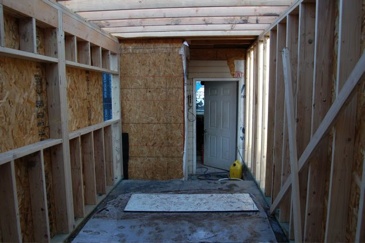
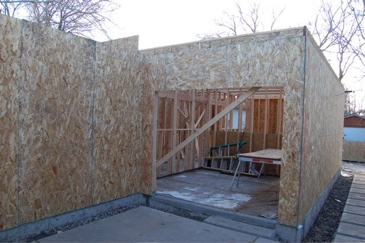
 Benchmark Renovation is in charge of doing all the framing and siding. Yesterday they had three guys at our house, and they started framing up all the walls. They pretty much got all the walls up except the connecting corridor. The picture above is from the corner of the patio looking at our bedroom. The big opening is where the 8' slider goes. You can also see where all the windows will go to the right of the sliding door.It's really crazy to actually see it with walls up. No matter how good a drawing is, it's hard to really visualize what the space is going to feel like.
 We ordered our back door yesterday. We really should have ordered it some time ago, but I guess better late than never. We got it through a local company called Quality Doors, and it is actually being made at a local mill. The picture to the left is not exactly what it will look like, but it's a pretty good representation. We got a full light maple door with square sticking. That means that it has the big window, is made out of solid maple, and doesn't have any weird trim pieces around the glass, just nice and square. I think that the maple will match the baltic birch that we are using for our cabinetry closer than a birch door, plus it was a little cheaper. Total price built, and pre-hung on a maple jam with satin hinges was $600. Not too shabby at all. I will have to put a spar urethane on it myself to protect it, but that will be easy. Perhaps the best part of it is that they are only 4 weeks out, which is a lot better than some of the other options that we were looking at.
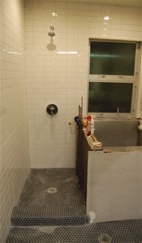
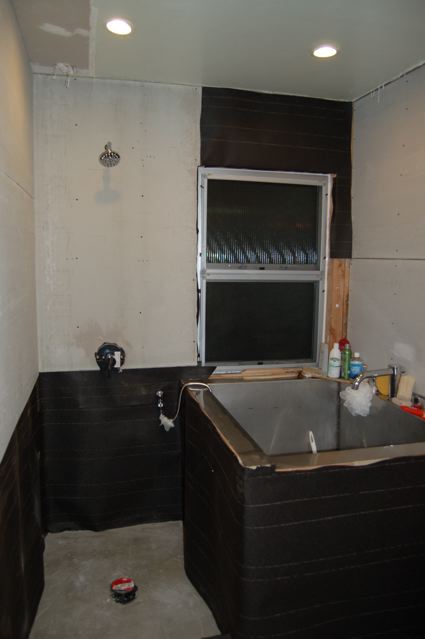
 I started tiling our bathroom last week. I set the floor tile on Wednesday night and grouted it on Friday. Let me just say for the record, that grout is a wonderful thing. It makes a not so hot tile job look pretty darn good. On Saturday I put up the rest of the dura rock (minus one side of the tub that I was still clamping and gluing) and started on the wall tile. My stepdad and father in law both stopped by Saturday night and helped with all the wall tile. It was a huge help too. I never could have gotten so much done without them. I ended up getting close to half the bathroom done, and we are getting very close to being able to shower. We can hardly wait!

 We spent last weekend and a couple of nights this week getting everything ready to tile in the bathroom. Since we want to be able to get the whole floor wet without worrying about it getting funky under the tile we went ahead and covered the whole floor with a PVC membrane. It is a bit overkill, but at least we know it is done right. Next we had to get the slope correct so that the water goes toward the drains. I cut some thin strips of wood with the proper slope to help guide me as I put down the drypack. It ended up raising the floor almost 2" at the far side. The first time I did the dry pack I made it too dry, and I had to go back and redo it all a couple days later. I got it right eventually. We are going to spend the weekend tiling, and will have all the floors done, and hopefully a good deal of the walls too. My wife can't wait, it has been almost 8 months since I tore our old shower out. Did I ever mention how wonderful and patient she is?
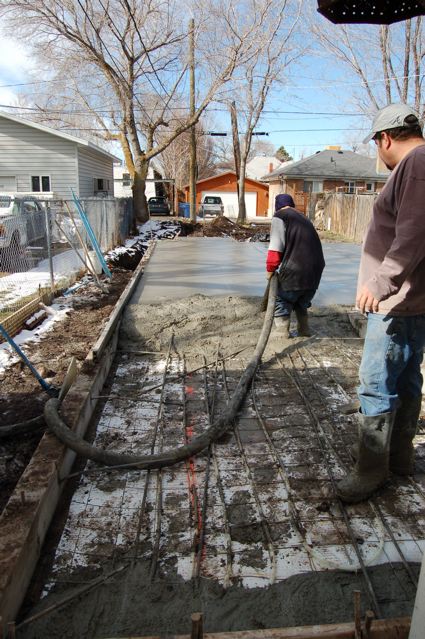
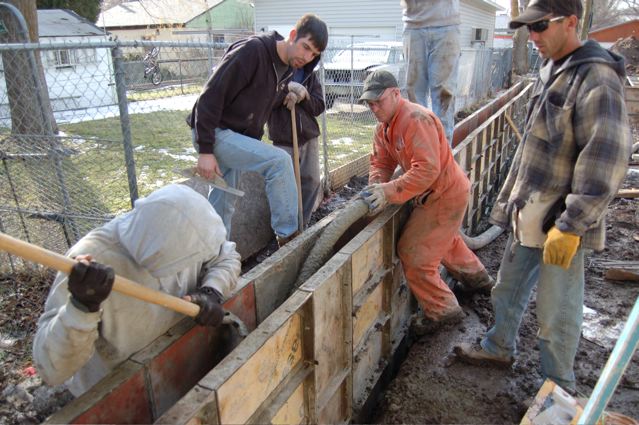
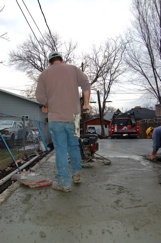
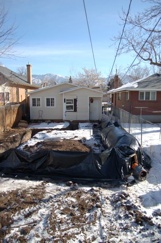
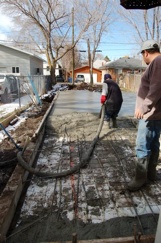 After much preparation we finally got our floor poured yesterday. For a while I almost thought we weren't going to make it. There were some last little things I had to get done with the radiant tubing, and I had forgotten that I had to get a mechanical permit for the radiant system as well. When the inspector came by on Tuesday, he pointed out these short comings and said we had to fix them before we could pour. I scrambled Tuesday to get a permit, and finished up the radiant at 10:00 that night. The weather was beautiful yesterday, and it was our one window before it starts to get snowy again. The crew from Savage Construction put in a long day, and did a beautiful job. They ended up power troweling the house section, and hand finishing it until it was super smooth. I bought them all dinner while they waited for the last section to cure enough to finish it, and it was after 7:00 at night before they got out of here. Today they will seal it well and get it covered before the snow storm tomorrow. Next week we should hopefully start framing our house up.
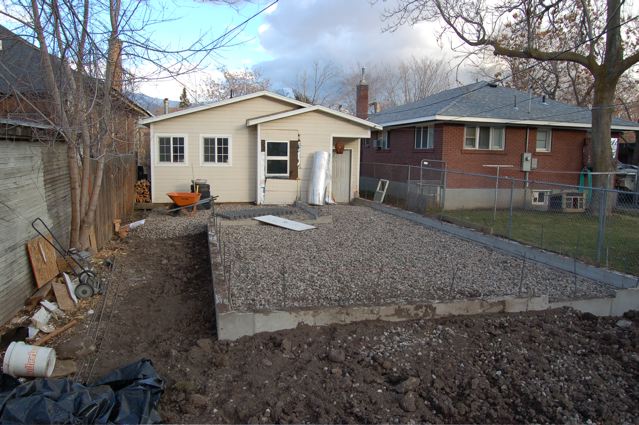
 We got our final grading done the other day. It's crazy to see those four foot walls just get buried. We also went and picked up all the supplies we need to put our radiant heat in. It was only $730 for everything, and it should be fairly easy to get it all hooked up, especially compared to what we had to do when we put it in the house. Once we get the radiant in, we should be ready to pour. I am meeting today with the flatwork guy to go over any last details, and I hope that we will be able to pour on Friday. It's supposed to be in the 50's, so it would be a great day to get it all done.
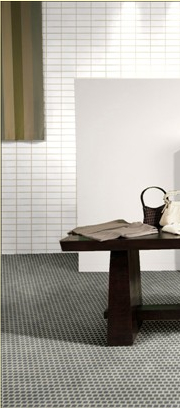
 Over the weekend we finally got all the wall tiles for our bathroom. We had really wanted to go with something like the Ann Sacks Avalon. I absolutely love the skinny rectangular shape. Unfortunately with 200 square feet of tile, the $8 price per square foot doesn't work out to be a small number. We still wanted something similar to that shape, and were able to find the next best thing at Home Depot. They had Dal Tile 3 x 6 white subway tiles on clearance for $1.60 a square foot. We had to go to two different stores to find enough tiles, but it was very affordable. We plan on putting them up using a column pattern (one directly above the other) instead of the more typical brick pattern used with subway tiles. We also got all the sand and concrete we need to float the floor before we can tile, and the plastic membrane that goes down as a first layer. There is a good website here that explains the process.
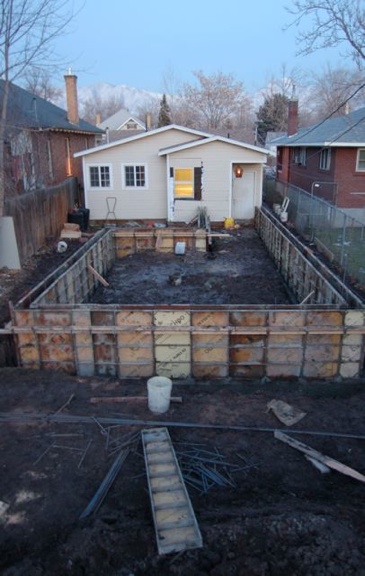
 We have foundation walls! They got everything formed up yesterday. The inspector came by a little after 2:00 and checked the rebar and setbacks again. I had done some surveying the night before to prove where our real property line was, so that there was no question about the setback. The inspector agreed that everything looked good, and we started pouring some concrete. It is crazy to see how big 600 square feet looks (see pic after the jump). It definitely will be a significant addition to the amount of living space we have.
Next we will wait a couple days until the walls have set up well, and then we have to get a bobcat inside to do all the final grading for the slab inside. Once all the grading is done, I can put all the radiant tubing down, and then we can pour our floor and the patio and pavers. Hopefully we can get all of that done next week. As long as the weather stays nice it should all go like clockwork. I've got my fingers crossed.
We have foundation walls! They got everything formed up yesterday. The inspector came by a little after 2:00 and checked the rebar and setbacks again. I had done some surveying the night before to prove where our real property line was, so that there was no question about the setback. The inspector agreed that everything looked good, and we started pouring some concrete. It is crazy to see how big 600 square feet looks (see pic after the jump). It definitely will be a significant addition to the amount of living space we have.
Next we will wait a couple days until the walls have set up well, and then we have to get a bobcat inside to do all the final grading for the slab inside. Once all the grading is done, I can put all the radiant tubing down, and then we can pour our floor and the patio and pavers. Hopefully we can get all of that done next week. As long as the weather stays nice it should all go like clockwork. I've got my fingers crossed.
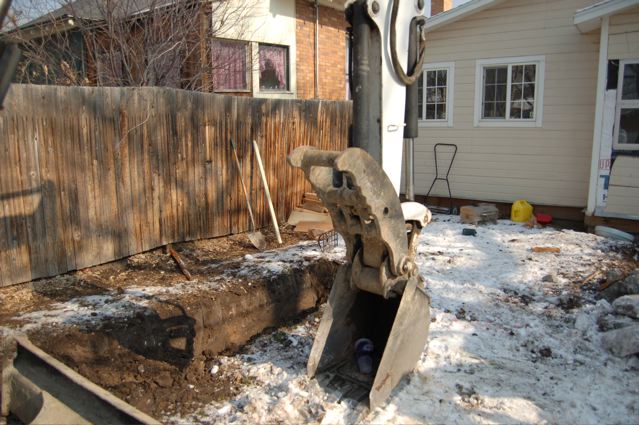
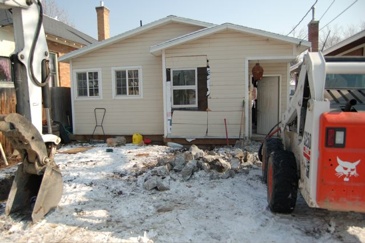
 I mentioned last week that the excavators were having a hard time digging in the backyard because the frost was so thick. Last Wednesday they were here again, and gave it a go for a couple of hours before they threw in the towel. They told me I would have to either pay for them to use bigger equipment, or wait until the yard thaws. Money and time are the two things we have the least of these days, so I took a compromise of the two. I bought a 70,000 BTU diesel heater about 50 gallons of biodiesel and some visqueen to make a little tent where they need to dig. I spent the weekend heating the ground to get it nice and supple for them this morning. Luckily the weather was on our side too, and it got up to the mid 40's both Saturday and Sunday. With any luck they will have it all dug by noon today, and the concrete guys will be able to start pouring the footing. Cross your fingers and stay tuned.
Total cost of heating a backyard, about $300.
I mentioned last week that the excavators were having a hard time digging in the backyard because the frost was so thick. Last Wednesday they were here again, and gave it a go for a couple of hours before they threw in the towel. They told me I would have to either pay for them to use bigger equipment, or wait until the yard thaws. Money and time are the two things we have the least of these days, so I took a compromise of the two. I bought a 70,000 BTU diesel heater about 50 gallons of biodiesel and some visqueen to make a little tent where they need to dig. I spent the weekend heating the ground to get it nice and supple for them this morning. Luckily the weather was on our side too, and it got up to the mid 40's both Saturday and Sunday. With any luck they will have it all dug by noon today, and the concrete guys will be able to start pouring the footing. Cross your fingers and stay tuned.
Total cost of heating a backyard, about $300.
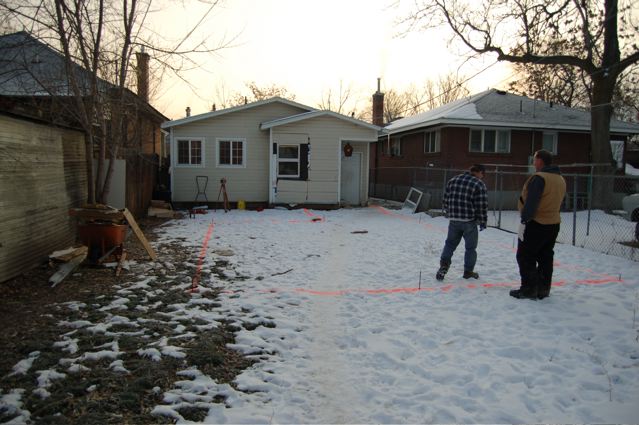
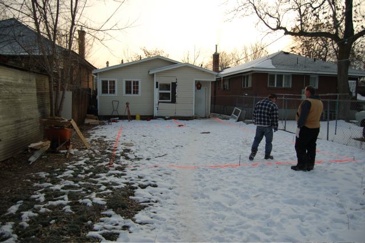 With our loan in place, we can finally start on our addition. We spent some time carefully marking out the exterior walls of the addition for our excavator. You can see in the picture above the outline of the addition. It was crazy to see it all marked out, it really is going to add a substantial amount of room. The next morning the excavators came. It isn't a whole lot of trench to dig, so they figured it would take about 4 hours. Much to their, and our dismay, they were way off. The ground is so frozen that they ended up having to use the jack hammer attachment to break through the first 18" of soil, that made for some slow work. They were able to get the whole north side (left side in the picture) done, and they should be back tomorrow to finish things up.
More pics of the action after the jump.


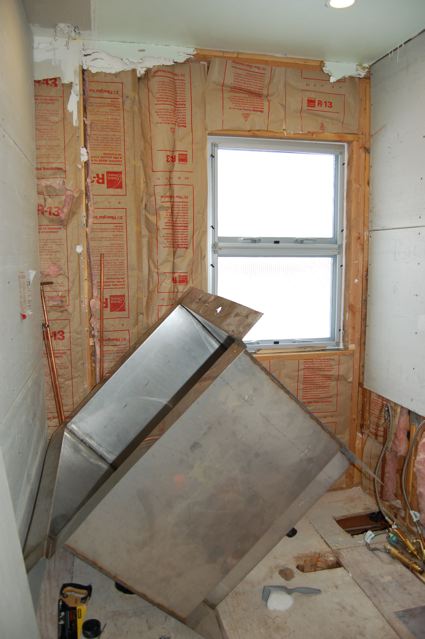
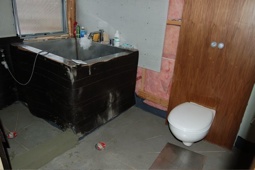
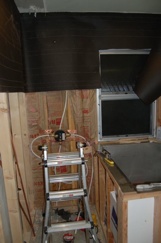
 So this weekend, I was battling a bad cold, but I still had time to work on the shower a little bit. It was actually a multiple day project that started last weekend. First I had to install all of the floor drains. There is one inside the shower area, and one just outside the ofuro tub as well. The second will act as a drain for the tub overflow, and will be covered by a wooden shower mat eventually. After putting the drains in I had to frame in the ofuro tub, which meant ripping it all out again, and building a frame for it to sit in. After I got it all framed up, I poured a 1/4" skim coat of vinyl concrete to level the floor out. Next layer will be some sort of waterproof membrane, and a drypack layer to get the slope right. Last will come the tile.
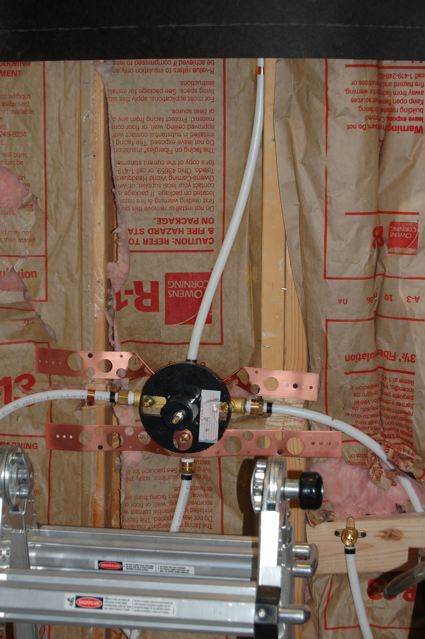
I also got our shower all plumbed. Until now all the plumbing in the house (except the radiant) I have done in copper. There were a couple angles in this project that made it impossible to do with copper, so I ended up doing it all in PEX. I have to admit, it was a lot easier and a lot faster. I can see why most people are crossing over.
The walls all got a layer of 30 lb building paper, to help waterproof them, and then durarock paneling. Last will be the tile, and we will finally have a functional bathroom.
So this weekend, I was battling a bad cold, but I still had time to work on the shower a little bit. It was actually a multiple day project that started last weekend. First I had to install all of the floor drains. There is one inside the shower area, and one just outside the ofuro tub as well. The second will act as a drain for the tub overflow, and will be covered by a wooden shower mat eventually. After putting the drains in I had to frame in the ofuro tub, which meant ripping it all out again, and building a frame for it to sit in. After I got it all framed up, I poured a 1/4" skim coat of vinyl concrete to level the floor out. Next layer will be some sort of waterproof membrane, and a drypack layer to get the slope right. Last will come the tile.
I also got our shower all plumbed. Until now all the plumbing in the house (except the radiant) I have done in copper. There were a couple angles in this project that made it impossible to do with copper, so I ended up doing it all in PEX. I have to admit, it was a lot easier and a lot faster. I can see why most people are crossing over.
The walls all got a layer of 30 lb building paper, to help waterproof them, and then durarock paneling. Last will be the tile, and we will finally have a functional bathroom.
More pictures after the jump.
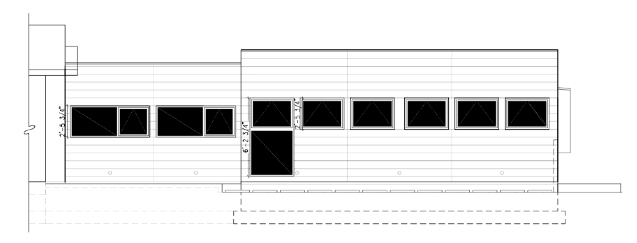
 We had to re-work the elevations of our addition the other day. We were planning on using hardi panel ripped down to 9 3/4". Turns out it is a lot easier to get Hardi Trim so you don't have to spend all that time cutting it down. Unfortunately the Hardi Trim only comes in a 7 1/4" width, so we had to change the window sizes a little to get it to all line up right. Doesn't look to much different, but I thought I would post a pic anyway.
I thought I should give an update on our house. I have spent the last couple weeks trying to get everything in order to apply for our loan. It amazes me what you have to do before the bank will give you any money. We had to have all our plans done, and approved by the city. We had to do all of our zoning variances and get our building permit. The worst part of it has been getting all the bids. It's hard if you don't know anyone to know who you should call to get a good bid from. Luckily I ran across a great General Contractor who was nice enough to kind of hold my hand through the whole process. He will be doing all the framing and siding for our house. We finally got it all together, along with every financial document we could find and met with the loan officer today. She said it all looked good, and that it should be a week or so until we can get the money. So far the numbers run like this; We bought the house for $106 thousand, put another $8 thousand into it, are taking out a loan for $60 thousand, and will end up with a house that appraises for $195 thousand. All in all not too bad of a deal, just a lot of work getting there.
Comments? Post them here in our forums.
 My wife and I will be in Phoenix this weekend. We should be rolling into town Friday sometime, and not leaving until Monday. We plan on trying to cross the border down into rocky point to get some good mexican food and walk on the beach. Besides that what are some other must do/see things in Phoenix for a modern lover.
Let us know in the forums.
My wife and I will be in Phoenix this weekend. We should be rolling into town Friday sometime, and not leaving until Monday. We plan on trying to cross the border down into rocky point to get some good mexican food and walk on the beach. Besides that what are some other must do/see things in Phoenix for a modern lover.
Let us know in the forums.
 Every year my wife and I have bought a real Christmas tree, but this year we are thinking about getting a fake one. It just seems like such a waste to spend all those years growing a tree, cut it, and then after a few weeks throw it away. What I would really like is a white alpine Christmas tree, but apparently that is easier said than done. The only one I could find in my google quest was this one from ebay. I don't really care if it is prelit or not, in fact I think I prefer if its not. The $200 for this one seems a little steep.
So what are you doing for a Christmas tree?
Comments? Post them here in our forums.
Every year my wife and I have bought a real Christmas tree, but this year we are thinking about getting a fake one. It just seems like such a waste to spend all those years growing a tree, cut it, and then after a few weeks throw it away. What I would really like is a white alpine Christmas tree, but apparently that is easier said than done. The only one I could find in my google quest was this one from ebay. I don't really care if it is prelit or not, in fact I think I prefer if its not. The $200 for this one seems a little steep.
So what are you doing for a Christmas tree?
Comments? Post them here in our forums.
 When it comes to affordability there are many different aspects to take into account. The quality of the product is an important issue many people think about. One thing that is often overlooked is what the product is going to cost the earth. As green becomes the new black, we are seeing more and more manufactures starting to take environmental costs as serious as their production costs. This is the case with the new Think Chair from Steelcase. Made with up 44% recycled materials and 99% recyclable at end of life the think chair has truly been thought through from start to finish.
I was able to get my hands on one of these chairs for some real life testing. Assembly was a cinch, with only two bolts to attach the back to the rest of the frame. The design is well thought out, especially with the mesh back. Like any good office chair, the Think Chair is very adjustable. Once properly adjusted, it is very comfortable. I was especially impressed with the memory foam arm pads. The design is simple and clean and fits in great with a modern decor. If you are in the market for a quality office chair, and can afford it, why not get one that doesn't cost mother earth an arm and a leg.
When it comes to affordability there are many different aspects to take into account. The quality of the product is an important issue many people think about. One thing that is often overlooked is what the product is going to cost the earth. As green becomes the new black, we are seeing more and more manufactures starting to take environmental costs as serious as their production costs. This is the case with the new Think Chair from Steelcase. Made with up 44% recycled materials and 99% recyclable at end of life the think chair has truly been thought through from start to finish.
I was able to get my hands on one of these chairs for some real life testing. Assembly was a cinch, with only two bolts to attach the back to the rest of the frame. The design is well thought out, especially with the mesh back. Like any good office chair, the Think Chair is very adjustable. Once properly adjusted, it is very comfortable. I was especially impressed with the memory foam arm pads. The design is simple and clean and fits in great with a modern decor. If you are in the market for a quality office chair, and can afford it, why not get one that doesn't cost mother earth an arm and a leg.
Available from Steelcase starting at $699
Comments? Post them here in our forums.
 Sorry for the late post, I'm a little under the weather today.
Today Brady roofing finished up the last touches on our roof. The picture here is actually from yesterday when they still had some loose ends to take care of. Their crew did a great job and were great to work with. I got the original bid from them about 4 months ago, and they have been faithfully calling me every two weeks to say "looks like we have you scheduled for monday". Back when we didn't even have our excavation done it was pretty funny. I was glad to finally be ready for them to come. For those that are following pricing, the bid came in just over $6,000. It could have been less if we had made some different design choices, such as sloping the roof with the framing instead of having the roofers do it on top.
Sorry for the late post, I'm a little under the weather today.
Today Brady roofing finished up the last touches on our roof. The picture here is actually from yesterday when they still had some loose ends to take care of. Their crew did a great job and were great to work with. I got the original bid from them about 4 months ago, and they have been faithfully calling me every two weeks to say "looks like we have you scheduled for monday". Back when we didn't even have our excavation done it was pretty funny. I was glad to finally be ready for them to come. For those that are following pricing, the bid came in just over $6,000. It could have been less if we had made some different design choices, such as sloping the roof with the framing instead of having the roofers do it on top.