Bathroom Vanity Finished

Dsc 0019-16Things happen slower when you do them yourself. Over a year ago I posted about our bathroom vanity that I had just built. I did a walnut base and a concrete countertop. The only thing that was left to do was the drawers. It sat that way for over a year, but it's finally finished. I was able to do all the drawer fronts out of one continuous piece of wood so that the grain pattern follows all the way across. It's those little details that make me really like it the most. I opted to use no handles, but instead beveled the bottom edge of the drawer for a comfortable grip. I think it turned out pretty nice. It's funny because I really love all the walnut in the bathroom, and very little of it was planned. The walnut behind the toilet was because we didn't have enough wall space for the wall hung tank in the wall, and the walnut above the mirror is because they had to cut the mirror short to get it past the sink when installing it. In hindsight, I wouldn't have done it any different.

Dsc 0020-15 Dsc 0025-7

The details

Detail
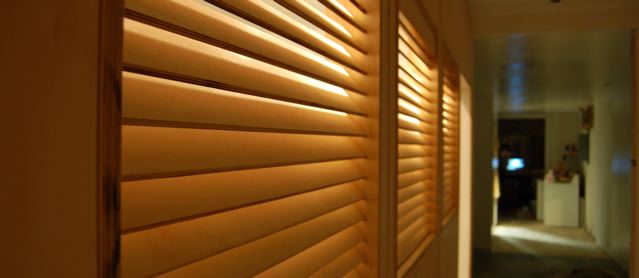
I have had a couple questions about some of the detail in our addition, and I though I would take a minute to answer some of them. First off, the wood paneling in the hall.All the panels are made of 3/8" baltic birch plywood. Baltic has a much lighter appearance compared to normal birch, but in my opinion it's worth the extra money. I had a great theory on how to hang it (courtesy of Chris from Gleason Woodworking Studio) and it kind of worked. The idea was to use a keyhole shaped router bit to route out a channel on the back side of all the panels. Then you screw a normal drywall screw into the studs on the wall at the same height. The head of the screw fits just perfect into the fat part of the keyhole and the shaft fits in the skinny part. That allows you to just slip the panels on and they are securely fastened with no exposed nails anywhere.

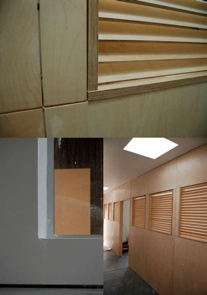
It probably would have worked flawless if I had bought a slightly thicker panel1/2" or even better 3/4". The problem was with the 3/8" I had to keep it pretty shallow, so they were kind of prone to ripping through. Problem number two is it becomes real hard to slip the panels on unless the wall is dead straight, which of course mine wasn't. I ended up doing a combination of keyhole channels, and nailing them from the front on the edges. For all the joints, I routed out a tiny 1/6" groove half way down on the side. That way when they butt together you get that nice 1/8" deep reveal, which looks a lot nicer than a plain old butt joint. I also held the bottoms of the panes about 3/8" above the finished floor (the concrete) to match all the drywall.

Windows: 
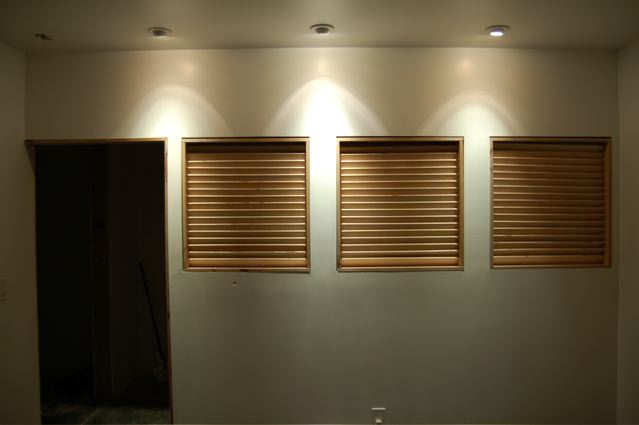
The casing on the louvers and doorways is 3/4" baltic birch. I left all the raw plywood edges exposed instead of putting edge banding on. It's a lot more honest look, and it makes it a lot easier to do as well. The louvers themselves are made of the same 3/8" baltic birch as the panels. I built the boxes that they go in first, and then just nailed all of them from the outside. That proved a lot more challenging than I thought it would be. Hitting a 3/8" target 500 times in a row just wasn't happening. I had quite a few misses, but in the end they turned out all right.

Drywall: 
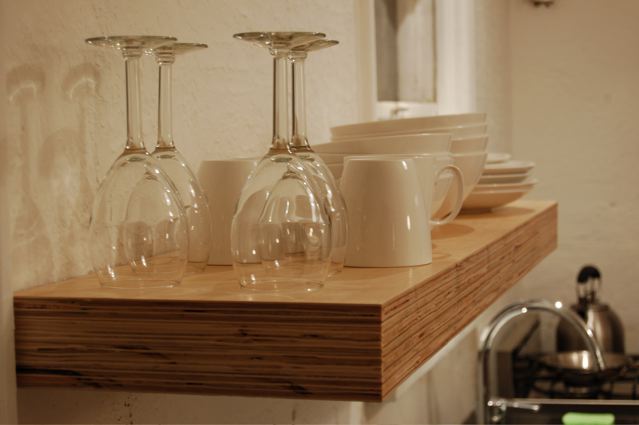
The drywall didn't turn out quite as clean as I had hoped. If we weren't on such a timeline (our due date was yesterday) I would have called them back 3 or 4 more times until it was nice and smooth like I wanted it. The did do a good job on some things though. Instead of baseboard we just floated the finished drywall 3/8" above the finished floor. They used a tear away L bead from trim-tex to finish all the bottoms. See the zoomed in picture above. It ends up leaving a nice clean edge all across the bottom. The look is really nice on the eye, and we'll see if it becomes a cleaning nightmare or not.

Lighting: Besides our fans, and some sconces we still haven't gotten for the hall, most of our lights are 4" eyeballs. We just bought the standard Halo cans, and then some after market eyeball lights to put in them. The good thing about using a very standard can like a 4" Halo, is that you can easily change out the trim anytime in the future. There are some off brand eyeballs that are nice, but they are not standard sized at all, and if they ever died on you for some reason, it would be very hard to replace them.
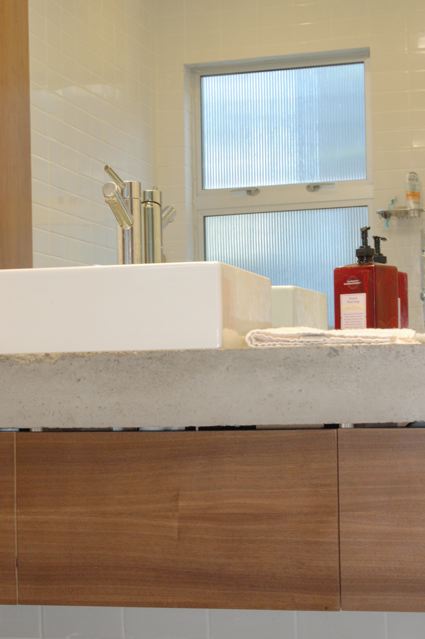
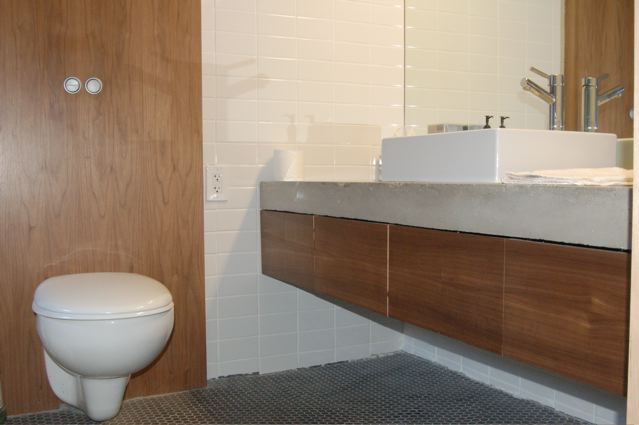
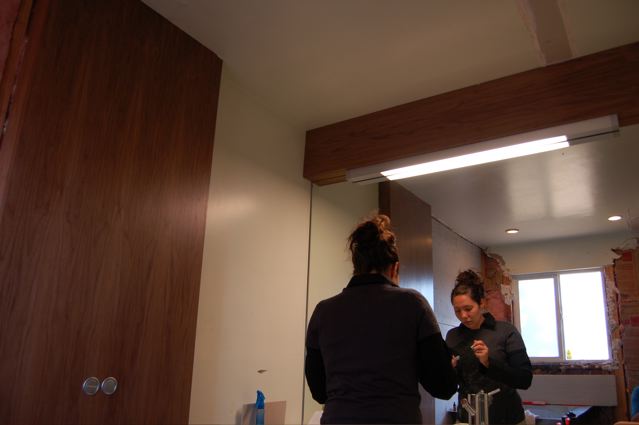
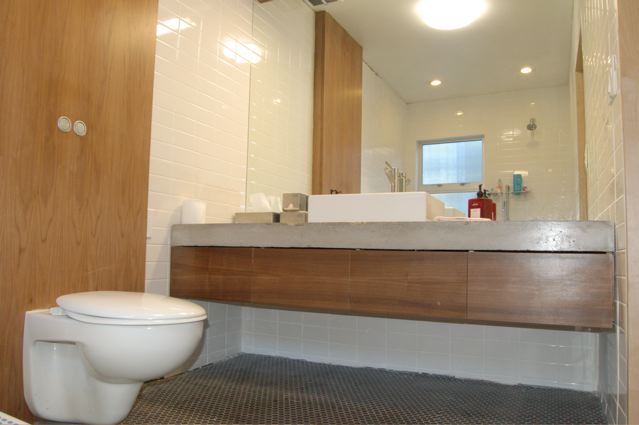
Finish Carpentry

Dsc 0006-10I took two days off earlier this week to work on some of the finish carpentry. There is a lot of it in our house, which will be nice in the end, but right now it is very time consuming. I managed to get all the birch paneling done in the hall, as well as all the casing on the bedroom doors. The louvered windows are what took the most time. They really complete the rooms though, and will be great to have when we get the skylights installed. The idea is that when the skylights in the hall are open it will draw air from the courtyard windows, through the room and out the skylights. It should provide for some great passive cooling. So far the temperature in our house has been great as long as we open all the windows at night, and close them in the morning. Dsc 0004-10

Dsc 0005-21Dsc 0008-10

Floating Shelf

Dsc 0008-3I've been slow getting my friends cabinetry done. The last week or so I have been slowly chipping away at some of the last things I have to do. Just to prove that every once in a great while I actually do get something done I am posting some pics today of a floating shelf I finished for him a while ago. It is made of 4 layers of birch plywood from home depot. The veneer layers aren't quite as nice on the home depot stuff as it would have been with a nice baltic birch, but the home depot stuff is almost $20 cheaper a sheet. To make a floating shelf you make a "box" with a hollow inside. You then make a bar of sorts that fits perfectly into the cavity of your "box" and bolts to the wall. Bolt the bar on nice and level, then slide the shelf over the top.

Total cost of materials, about $20.

Comments? Post them here in the forums. More pics after the jump.

Dsc 0011-3

Curbly How To

Bed Top-1 I posted about the affordable modern platform bed I made for our good friends a while ago. Some of you wanted a little more information about how I built it. I finally got around to giving a somewhat better description of the process today, complete with some sketch-up renderings that are not even close to scale. I posted it over at Curbly in the how to section. Check it out.

Bathroom Mirror

Dsc 0007-5Our bathroom is long overdue for a little handy work. Last week I finally got a chance work on it a little. I mentioned previously that we had our mirror put in, but failed to mention it didn't quite go as planned. The mirror was supposed to go all the way to the ceiling, but because of the walnut surround on the toilet, and the sink being mounted, it didn't happen. They ended up having to make a field cut (and a crooked one at that) to get it maneuvered into place. This left us with a 12" gap above the mirror that we had to fill. I ended up making a nice walnut detail that protrudes out similar to the toilet surround. It also gave us a nice place to mount our vanity light. Overall I think it turned out pretty nice. Comments? Post them here in the forums.

Affordable Platform Bed

Dsc 0005-5My good friends mentioned to me some time ago that they were looking for a platform bed. They are West Elm junkies and have an nice modern style going on in their house, so I quickly offered to build one for them. Just a couple of weeks ago, they had an anniversary coming up, and I had an opportunity to build one as a surprise. They wanted something similar to the West Elm Low Platform Bed but slightly different dimensions. We ended up making it out of walnut (my new favorite wood) and it turned out really nice. We made it a little chunkier than the Low Platform. It sits at 10" high overall instead of 5", and it is a couple inches shorter too.

Price of materials $280.

Detail pics after the jump.

Comments? Post them here.

Dsc 0013-4

Cabinetry update

Dsc 0002 2-1A while ago I posted some pics of some cabinetry I had done for a friend. I am still not finished (need to do some drawers) but he did finally get the top on, and it really tied it all together nicely. The countertop is a honed absolute-black granite. Its a beautiful slab, and looks great on top of the cabinets I built. His whole house is turning out really nice. One of these days I need to get over there and take a bunch more pictures. It truly is a great model of an affordable modern home. It's in a transitional neighborhood, and the lot is a little small, but he paid well under $100 k for the home. I think his goal is to have it all done for around $120 k, which he should do pretty easy.

Bathroom Update

Dsc 0010 2Well after several weeks of waiting, we finally started to make some more progress in the bathroom. For a little background, check out this post about our ofuro tub plans. I'll give more details about the tub later. We finally decided on a tub filler for our ofuro. We ended up going with the Danze Parma, mostly because it fit our style, and more importantly, our budget. That doesn't mean of course that it was really affordable. It ended up being right around $300, which seems like a lot of money until you see what the other options are. Before we could put our ofuro tub in, we had to rip out the old shower and tub. It turned out to be a pretty easy job with only one big surprise. The wall below the window was mostly rotted out from water damage. Luckily we plan on replacing that whole window, and so we will need to frame out that section of the wall again anyway. Getting the ofuro in place was fairly straight forward. It was a lot lighter than the other tub. I lined the two side walls with dura rock, so we will be ready to tile them soon. We were kind of nervous that our boiler and water heater would have a hard time filling the huge tub. I think we figured it was over 100 gallons pretty easy. To our pleasant surprise, our boiler did just fine. The tub accommodates two people quite comfortably. My wife and I spent about an hour soaking in it the first night it was done. We also had our mirror delivered finally, which makes the bathroom feel a lot bigger. Check out the pics after the jump to see what I mean.

Dsc 0013-3 Dsc 0009

Dsc 0007-2

Dsc 0012-1 Dsc 0011

FInished the Caroma

Dsc 0051Well, I finally wrapped up another small project. I have had our Caroma Walvit toilet hooked up and functional for about a week now, but I was waiting until I had the walnut section done to post about it. So far we are liking the toilet, although I am still not sure if it was worth the money. The whole dual flush thing does make me feel good about myself though. Who knows, another 50 years and it will pay itself of in the water we are saving.Today I finally had time to build the walnut column that the toilet hangs from. It is made out of the exact same material as our vanity I did a while ago, so it is a nice match. We are planning on doing white tiles on all the walls, so I think that the walnut will break things up nicely. Plus it lines up with the doorway exactly, so it makes for a pretty dramatic first view into the bathroom. Now that I've got that out of the way, I can start working on getting our ofuro tub installed.

As always, more pics after the jump.

Dsc 0048

Dsc 0040

Affordable modern kitchen cabinets

Dsc 0027 2Yesterday I shared some pics of a bed I made for my friend. Today I have some pics of some of his kitchen cabinetry I have been working on. It's not done by any means, but it gives you a bit of an idea what it will look like when it is all done. The cabinets are birch, with a water based poly urethane finish. Drawers are mounted on heavy duty, full extension, ball bearing slides, so they will last forever. Doors are attached with Salice Euro hinges. We are still looking for some good hardware. The cost in materials for these two 38" lower cabs came in around $250. Do the math and that is about $50 a linear foot. They are very over built too. I even used 3/4" ply for the backs instead of the normal 1/4". I think they turned out pretty decent for my first real kitchen cabinets. More pics after the jump.

Dsc 0028

Dsc 0026

Dsc 0024

Dsc 0023

Affordable modern platform bed

Dsc 0001-5My architect friend is re-doing a small pad about a mile from my house. About a month ago, he was getting ready to move in, and was looking for a bed. Unsatisfied with what he was finding in the stores, he drew me a quick sketch and asked if I could build it. Since I never turn down an opportunity to try something new (especially when someone else is buying the materials) I was all over it. The design was really quite simple. Two plain boxes wrapped in birch with a cantilevered top. The edges on the top were left exposed to match the desk I did for him a while ago. All in all I think it turned out pretty good. The price for materials was right around $250 when it was all said and done. The mattress is a 9" memory foam. The duvet is by Dwell. Lots more pics after the jump.

Dsc 0002-2

Dsc 0020-1

Dsc 0018

Dsc 0015-1

Dsc 0006-1

Dsc 0005-4

Dsc 0012

Concrete countertop installed

Dsc 0001 2-1Last week I promised some pictures of the bathroom vanity that I started making, and of the concrete countertop installed. Well, here they are. The countertop turned out pretty good. There were some small bubble pockets on the top from not vibrating it enough, and there was a small 1" section on the front corner that chipped off. I think the chip was due to messy caulking of the edge causing the concrete to weaken (all the corners of the form get a small smear of caulk to give it a slightly beveled edge). I ended up finishing it with a water based penetrating sealer from The Concrete Exchange and a natural wax on top of that. I highly recommend the sealer, it was great to work with, and looks sweet. For the vanity, I still have to make some drawers for it before it is done, but so far I think it has turned out nicely. You can see in the pictures below some before and after pics. This whole vanity and sink actually sit where the door to the bathroom used to be, which means I had to move all the water and sewer to a new location. As far as prices go, the vanity so far is under $100. It will be closer to $150 after drawer slides and hardware. The concrete countertop comes in around $50, the sink $120, and the faucet $80. Not too shabby.

Dsc 0006 Dsc 0002 2

Concrete Countertop

Dsc 0002Dsc 0005-3 For our new bathroom remodel we decided to go with a concrete countertop. Partly because the price is totally right, and partly because we really like the look. We have done a concrete table top in the past, so we figured it wouldn't be too hard. The slab is an 1 1/2" thick with a 4" lip on the front, and is reinforced with wire and rebar. It took three bags of quickcrete 5000 and one sheet of melamine. Well actually two sheet of melamine, because I cut the first one an inch too short, and had to go get a new sheet. Oops. Minus the extra sheet the whole cost came in at about $50. Not bad at all. The fact that we had an above mount sink made the form super easy. Above are the pics of the form before the pour, and after. Next week I'll put up pics of it installed, plus the walnut vanity that it sits on.

Desk Install

Dsc 0001-3Yesterday I mentioned that I was starting to do some cabinetry. It's funny how it started. At the time I had just spent some time with Chris Gleason of Gleason Woodworking, and was wanting to start doing cabinetry and custom woodworking. My friend and architect Seth had just bought a new house that he gutted and was remodeling. I mentioned to him I would love to do his cabinetry. We agreed to trade his cabinetry for my house plans. I scrambled to buy all the tools I needed and rent a small space I could put them all. Yesterday I installed the first of his cabinets, pictured to the left. It is a drafting height counter and set of drawers in his master bedroom. It almost doesn't look it in the picture, but it stands almost 40" tall. All the drawer fronts are European baltic birch, and the top is a natural birch with an exposed 1 1/2" font edge. It was finished with a water based polyurethane. All the credit of design goes to Seth. As far as build time goes, I did it between working lots of overtime, but it probably took me around 8-10 actual hours of working on it. The crazy thing is how inexpensive it was to build. It was probably about $170 in materials. Not too shabby.

Grassrootsmodern Design?

ShopI have been into the design scene for just a little over two years now, and blogging for just under a year, but I must admit it has had a change on me. Seeing all those people like Furni, MAKR, Gleason Woodworking, etc start out with just a dream and be able to make something of their passions has lead me to believe I could actually have a job I enjoy. Unfortunately blogging doesn't pay the bills, so I had to look for an alternative creative outlet. My real passion lies in furniture design. I considered seriously for a while going to ID school, but the reality is I want to work for myself, so a degree is probably not too important. Inspired by my friend and artist Chris Gleason, I decided woodworking would be satisfying and potentially profitable. So I threw caution to the wind a couple months ago, and rented a room a few blocks from my house, and bought a couple thousand dollars of tools and went to work. This morning I am going to install my first job. Its a countertop height desk in my architects house (another great example of affordable modern housing, more on that later). I'll be back with pictures later today or possibly tomorrow.