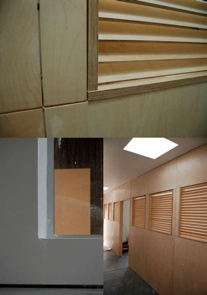
 I have had a couple questions about some of the detail in our addition, and I though I would take a minute to answer some of them. First off, the wood paneling in the hall.All the panels are made of 3/8" baltic birch plywood. Baltic has a much lighter appearance compared to normal birch, but in my opinion it's worth the extra money. I had a great theory on how to hang it (courtesy of Chris from Gleason Woodworking Studio) and it kind of worked. The idea was to use a keyhole shaped router bit to route out a channel on the back side of all the panels. Then you screw a normal drywall screw into the studs on the wall at the same height. The head of the screw fits just perfect into the fat part of the keyhole and the shaft fits in the skinny part. That allows you to just slip the panels on and they are securely fastened with no exposed nails anywhere.
It probably would have worked flawless if I had bought a slightly thicker panel1/2" or even better 3/4". The problem was with the 3/8" I had to keep it pretty shallow, so they were kind of prone to ripping through. Problem number two is it becomes real hard to slip the panels on unless the wall is dead straight, which of course mine wasn't. I ended up doing a combination of keyhole channels, and nailing them from the front on the edges. For all the joints, I routed out a tiny 1/6" groove half way down on the side. That way when they butt together you get that nice 1/8" deep reveal, which looks a lot nicer than a plain old butt joint. I also held the bottoms of the panes about 3/8" above the finished floor (the concrete) to match all the drywall.
Windows: The casing on the louvers and doorways is 3/4" baltic birch. I left all the raw plywood edges exposed instead of putting edge banding on. It's a lot more honest look, and it makes it a lot easier to do as well. The louvers themselves are made of the same 3/8" baltic birch as the panels. I built the boxes that they go in first, and then just nailed all of them from the outside. That proved a lot more challenging than I thought it would be. Hitting a 3/8" target 500 times in a row just wasn't happening. I had quite a few misses, but in the end they turned out all right.
Drywall: The drywall didn't turn out quite as clean as I had hoped. If we weren't on such a timeline (our due date was yesterday) I would have called them back 3 or 4 more times until it was nice and smooth like I wanted it. The did do a good job on some things though. Instead of baseboard we just floated the finished drywall 3/8" above the finished floor. They used a tear away L bead from trim-tex to finish all the bottoms. See the zoomed in picture above. It ends up leaving a nice clean edge all across the bottom. The look is really nice on the eye, and we'll see if it becomes a cleaning nightmare or not.
Lighting: Besides our fans, and some sconces we still haven't gotten for the hall, most of our lights are 4" eyeballs. We just bought the standard Halo cans, and then some after market eyeball lights to put in them. The good thing about using a very standard can like a 4" Halo, is that you can easily change out the trim anytime in the future. There are some off brand eyeballs that are nice, but they are not standard sized at all, and if they ever died on you for some reason, it would be very hard to replace them.
