 So yesterday I had a chance to get back up to the Canyons to take some better pictures of the suite. The picture above is probably my favorite of the bunch. It's always great when you get to put two Eames Lounge chairs in a space. The Cush rug from BluDot is pretty great too.


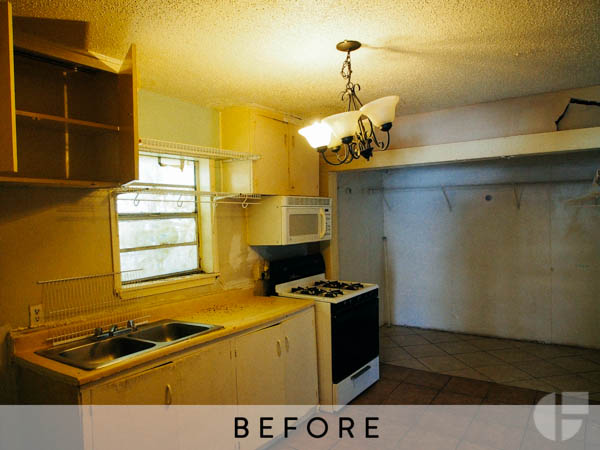
Doing the design in the suite I had two big challenges. First to make it not look like just another Park City rustic hotel room. This was actually pretty hard to do. Above are two pictures that show what the space looked like when we started. The top one is from the exact same view as the first Eames Lounge picture. Which do you like better?
To start we did a lot of taking things out. All of the furniture was removed from the room as were the cushions on the built in benches. Curtains were taken down, doors were removed etc. We even took down some light fixtures. Stripping everything out made the space so much better. There was still a lot of rustic feeling in the form of knotty pine woodwork that I could get rid of, but I had a plan for that. Now I just had to fill the space up with something that looked good. That brings us to the second problem.
Everything I put in the room had to be eco conscious. Everything. Ebay has a little primer for buying green that became my mantra.
#1 Buy Pre Owned - The greenest product is the one that already exists.
#2 Resource Saving - Do more with less.
#3 Sustainable - Materials Matter
Luckily I had some good guidance in this area from Zem of Ecofabulous. I generally think of myself as an eco aware guy but it's absolutely amazing how much more she knew about everything green. It was very educational for sure.
So without delay, here is the rest of the suite, and what went into it.


Entering into the suite there was a big ugly closet that greeted everyone. I took care of it by covering it with a large white board and some Urbio containers full of succulents. Not only did Urbio just win best accessory at Dwell on Design, it's also made of recycled plastic (#3). To top it off Beau, one of the designers, is an incredibly nice guy.

Also in the front entryway was a little niche that needed to be filled up. I used a Way Basics shelf here (and in several other places in the suite) because it's super affordable and made of 99% recycled material (#3). I filled it up with items I found at local thrift stores (#1).

Around the corner there is a short hall that looks into the kitchenette which is just off the main room. It's not the best looking kitchen so I gave it a little shield with a GORGEOUS rosewood Eames screen (#1) and a flower arrangement.

The main room is dominated by two vintage Eames Lounge chairs (#1) a small tulip style side table (#1) sitting on a wool Cush rug by BluDot (#3).

The wood benches needed some sort of padding on them because we removed the horrible looking pads there were on them. I covered two of them with 1" thick felt (#3) held in place with a rug pad. The felt is actually made of wool and recycled synthetic content (like recycled bottles). Pillows are fantastically eco friendly and come from Inhabit (#3).

The other two benches were covered with wool Flokati rugs (#3) held in place by a rug pad. Lots more pillows from Inhabit (#3) too.

Also in the main room were two Way Basics shelves side by side that I filled up with vintage pieces (#1) and succulents.

My favorite part of the shelf unit is a fantastic pair of white wooden clogs (#1) lit from above by the Pablo Clamp Lamp (#2)(#3).

Speaking of lamps, I didn't get a good photo of it, but the Moooi Miyake table lamp (#2)(#3) is pretty fantastic as well although I do wish it put out a bit more light.


Perhaps my favorite piece in the room were the 6 Coventry Stools by Studio Dunn (#3). The are a nice little bit of eye candy for the room and they provide flexible seating or a convenient place to set a drink. Also a huge thank you goes out to the guys from Studio Dunn who built these 6 stools and shipped them to Utah with just a week or two of heads up.


The last seating area is the dining table built in bench. Unfortunately I couldn't remove those cushions, but I was surprised that they didn't look as horrible as I thought they would. In front of the bench is a vintage Brown Saltman coffee table by John Keal (#1) lit from above by a Claudo pendant by Cerno (#2). The wall behind the bench was covered with raw Wall Tiles by Inabit (#3).

There were two good outdoor patios that I filled up with vintage Bertoia chairs (#1) a vintage teak bar cart (#1) Emeco 111 Navy chairs (#3) and Tom Dixon Offcut stool (#3).


Last but certainly not least was the green fashion room. I designed three literal Pinterest pin boards for attendees to use. The idea is they pick out outfits from the clothes in the room, pin them to the board, and share them on Pinterest. The person with the outfit that gets the most pins wins and iPad. You should be able to see all the outfits by looking for the ebaygreenstyled hashtag on Pinterest.
Also in the room is the reclaimed clothes rack I designed. A few people have asked for more info on it, and I'll give a better DIY on how to make your own next week.


 Today in Park City hordes of social media mavens are gathering at the Canyons resort for the
  It was a whirlwind of a week last week, and I'm just now getting a chance to catch my breath. I'm usually pretty horrible about keeping people updated with all the personal projects I've got going on, so consider this an attempt to get better.
  As I type this post, I'm riding shotgun in a truck on my way down to southern Utah to a Buddhist Retreat. No, I'm not having another dramatic change of faith, I'm actually going to install cabinetry. The retreat was designed by a local firm