KNAPPA Pendant

20Dec07

Dsc 0012-13
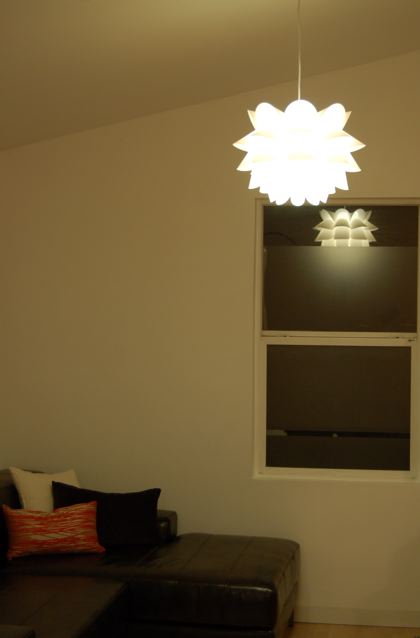
We have been doing a lot of shopping at Ikea lately thanks to our 20% cash back sofa credit. We bought two KNAPPA pendant lights for our front room, and last night I put one together and hung it. It comes with a plug end, but I cut the cord and hard wired it into the ceiling. I have to say that at $25 the KNAPPA looks 10 times more expensive than it really is. It totally transformed the look of the room, although admittedly the bare bulb hanging from the ceiling wasn’t doing much for the ambiance. Not only does it look great, but it was fun to put together too. I think it actually gives you a little bit more appreciation for the light having put it together yourself.

Available from Ikea for $25.

  • Digg
  • del.icio.us
  • Facebook
  • Google
  • Furl
  • Ma.gnolia
  • Reddit
  • Technorati
  • Wists
  • E-mail this story to a friend!
  • NewsVine
  • ThisNext

Comments

10 Responses to “KNAPPA Pendant”

  1. Mark on December 20th, 2007 8:37 am

    I did the same thing once in an apartment: Took one of the paper shade lamps, snipped the cord, and wired it where an ugly chandelier was.

    Because I had no control over the hole in the ceiling, and really took a budget approach, I spray-painted a small plastic bowl silver, drilled a hole in it to slip the cord through, and secure it onto the cord with a locking plastic tie that I snipped short.

    I was working for an interactive marketing agency at the time and they did a microsite for IKEA that sought to create a community of such suggestions. I managed to get my little project on there to help get things going.

  2. Maria B on January 5th, 2008 1:45 pm

    I just bought the Knappa light to replace the Home Depot-esque light fixture that came with my apartment. I have no idea how to hardwire anything - is it difficult? How can I find out how to do it?

  3. creede on January 7th, 2008 7:15 am

    Maria, Best thing to do is find a handy friend an have them show you how. You could also get a basic wiring book from your local library or home depot. Hard wiring them is as simple as cutting the cord and using wire nuts to attach the black wire to black wire and the white to white. Good luck, let us know how it turns out.

  4. Samantha on January 14th, 2008 12:21 am

    Kick ass, thank you so much creede! I just bought three lights from IKEA including the Knappa, brought them home and was so bummed to realize they weren’t hardware lights. I love that light, though, so now I’m excited to be able to put it up. A thousand thanks!

  5. David E. on February 10th, 2008 6:50 pm

    We have two Knappas over our dining room table. With 55 watt halogen spots in them the petals glow brighter on the bottom and darker at top. It’s a really nice effect.

  6. Maria B on April 6th, 2008 6:05 pm

    Okay, it took me from Jan 5 to this weekend to find the time and nerve to hang my Knappa from the ceiling. I’m pleased to report that it was actually really easy. It only took about 45 minutes and it looks awesome.

  7. creede on April 6th, 2008 7:34 pm

    Congrats Maria! Send us some pics.

  8. Emma on April 12th, 2008 6:10 pm

    I too bought the Knappa light from Ikea because I loved it, and have now found a place I want to hang it - have any of you managed to find fittings to surround the wire on the ceiling??? Thanks!

  9. [...] heard me say good things about the Ikea KNAPPA lights before. They are flat packed, assemble yourself, and look great for a pretty low price ($25). Well, [...]

  10. kathy on September 23rd, 2008 6:04 am

    Guys, if you want to cover the hole from existing lights, go to lowes or home depot and buy a medallion to fit over the hole. Just get a solid one and drill a hole in the center for your wire. Or check out this site for ideas. http://www.ceilingmedallions.com/index.php?app=ccp1&ns=catshow&ref=medallions-sm&sid=7pq0u40534xmw6dky6sz03euqo8u61z9

    Hard wiring is easy. Just cut off the plug. Strip off about 1/4 of an inch of the wire coating. (You don’t have to have a tool… if you are without a stripper just heat 1/4 inch of the coating with a match or lighter. Use a piece of paper to prevent burned fingers and pull off the heated portion and Voilá… bare wire)
    Black wire goes to black wire. Hold the bare wires together. Use a wire nut… the little plastic thingy with the metal inside. Screw it on the two wires you are holding together. It will twist them together on the inside. If you are a really nervous person or want extra protection put some black electrician tape around the wire nut. Do the same with white and white. IF you hang a light with a green wire. This one shouldn’t have that, then its the ground wire. You wire that to the wire in your ceiling that doesn’t have any coating on it. Use the wire nut the same way. Attach your light as directed or use adhesive for your medallion in this case and you have hardwired your light. Good job. Just think. You would have paid an electrician over $50 for that!!

Leave a Reply